This guide is intended to get you started using SquawkBox as soon as possible. It does not cover all the features in SquawkBox. For more information be sure to read the main SquawkBox user manual. This guide assumes you already have Microsoft Flight Simulator 2002 or 2004 installed on your computer.
First Flight with SquawkBox
- Install SquawkBox
Run the downloaded installer (sb3setup.exe). Ensure that Flight Simulator is not running while performing the installation. For more information, read Installing SquawkBox. - Start Microsoft Flight Simulator
Setup and start your flight in Flight Simulator. Ensure that you are not positioned on an active runway or you may give a nasty surprise to someone on final approach when you first connect. - Start SquawkBox
Select the Modules item from the Flight Simulator main menu and select Start SquawkBox. The splash screen will appear as SquawkBox starts. When the startup sequence is complete you should see the main SquawkBox window.
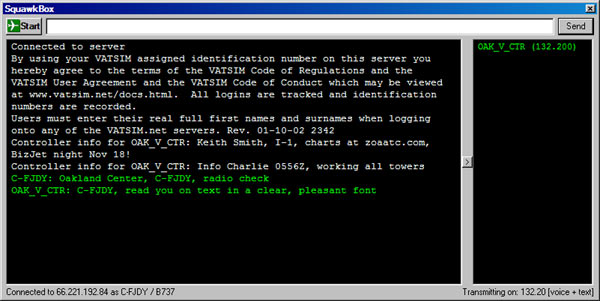
The Main SquawkBox Window
- Connect to the multiplayer session
If you are running Flight Simulator 2004 you can skip this step as the connection to the multiplayer session is done automatically when you login. If you are running Flight Simulator 2002, select Flights, then Multiplayer, then Connect.
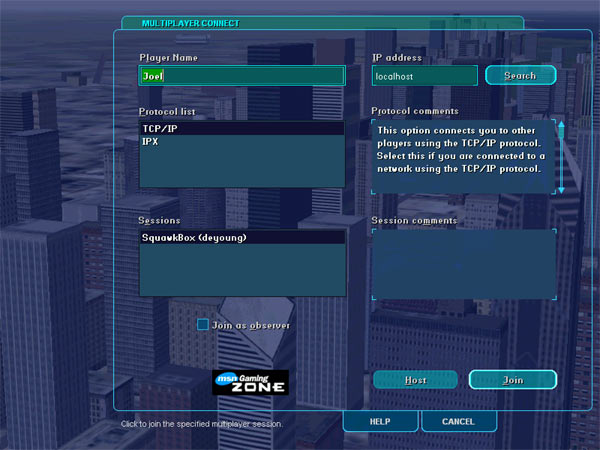
Connecting to the Multiplayer Session
Enter a player name and enter "localhost" in the IP address box. Then click the Search button. A session called "SquawkBox" should then appear in the Sessions list. Select that session and click Join button.
For more information on this, read Seeing other Aircraft.
- Calibrate your microphone
Click on the SquawkBox Start button and select Connect.... This will cause a warning to appear that you have not yet calibrated your microphone. If you intend on communcating with voice, click the Yes, calibrate now button to start the process. Ensure your microphone is plugged in correctly to your computer and then follow the directions presented. The calibration process will guide you through several tests. When completed it will let you know if there were any problems with the calibration. For tips on how to more effectively calibrate your microphone, read Communicating with Voice. You can repeat the calibration at any time by clicking on the Calibrate microphone button in the Voice Options dialog. - Connect to the Air Traffic Control server
When the Connect dialog appears, select a server to login to from the server list. Enter your login and password provided to you by your air traffic control network. Enter a callsign and your real name.The last step before connecting is defining which aircraft you are flying in. To do this click the Aircraft List... button. Then click the Add... button. Enter a name for the aircraft (it can be anything you choose) and select the type of plane from the aircraft type list. You can also choose the airline and special livery if applicable. These are optional however. For more information about specifying which aircraft you're flying, read Maintaining a List of Aircraft Click OK twice to return to the Connect dialog.
Lastly, click on the Connect button to complete your connection to the air traffic control server. If there are other aircraft in your vicinity you should begin seeing them within several seconds of logging in. For more information on connecting to the server, read Connecting to the Air Traffic Control Server
- Contact Air Traffic Control
The right hand pane of your main SquawkBox window should display a list of controllers in your vicinity. Tune your radio in Flight Simulator to the frequency indicated for the controller you wish to communicate with. If the controller is using voice you will hear a sound indicating that voice is now active and that fact will be indicated in the status bar on the bottom-right corner of the main SquawkBox window. Enter text in the main SquawkBox window to communicate with the controller using text. Press your Push to Talk key (it's Scroll Lock by default) and speak into your microphone to communicate with the controller using voice. - File a Flight Plan
Before you fly you will usually need to file a flight plan. Select Flight Plan... from the main SquawkBox menu to bring up the flight plan form.
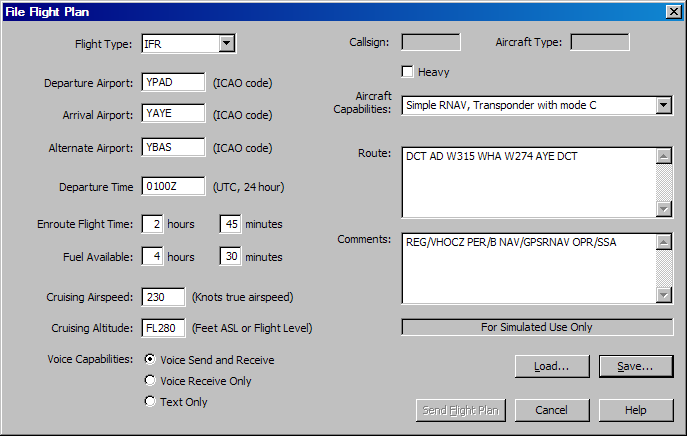
The Flight Plan Dialog
Fill out the form appropriate for your flight. When you're ready to file the plan click on the Send Flight Plan button.
- Fly
Once you have received clearance from air traffic control, begin your flight!
More Information
For more information read Introduction to SquawkBox. For detailed information of all the functionality available in SquawkBox, read SquawkBox Features.
To get answers to your questions, read the Frequently Asked Questions list. If you can't find the answer you're looking for there, try posting your question to the SquawkBox Forum.